Sunday 16 August 2020

Melton Mowbray Pork Pie


Now, what could be more 'Leicestershire' than the humble pork pie?  Another hunting food - created by local bakers as a portable snack to take out riding.  Dickinson and Morris, the original pork pie shop, is still open in Melton Mowbray.   Its website can be found here https://www.porkpie.co.uk/  

Recent legislation has ensured that the name 'Melton Mowbray pork pie' is protected, and they can only be so called if they are made within 10 miles of Melton.  Happy to say that our local butchers fits into this, and is now Melton pork pie certified.  Very good they are, too.  When you've had a pork pie so fresh that the jelly is still setting, you'll never go back to a shop bought one, I promise!

Megan loves pork pies - always has.  I can still picture her at about 18 months old, stretching out her little fist in her highchair and calling "pip pie pees!"  And yes, the name 'pip pie' has stuck - that's what we still call them at home. For her second birthday, I made a pork pie cake.  A bit raggedy round the edges - but she recognised it for what it was supposed to be!


Now, when I first met Nigel he told me something I thought really odd - his family always had pork pie on toast for Christmas breakfast.  I couldn't imagine how that would work, but he proceeded to show me the technique.  It's sliced very thinly before being arranged on the toast.  I did wonder if this was a French family oddity - until I plucked up the courage to ask our friendly local butcher.  They confirmed that indeed, this is a local tradition, usually served with Picallili. 

This site has some interesting facts about pork pie  https://www.greatfoodclub.co.uk/how-to-make-a-melton-mowbray-pork-pie/  It confirms that pork pie is a Christmas breakfast tradition - farm labourers would have the luxury of eating the pork that they'd spent the year raising, while their masters tended to have swan or goose.  Another source says that the tradition was started by DH Lawrence, who lived with his family in Nottinghamshire.  Anyway, it is a tradition - my husband isn't as bonkers as I thought!

And so to the recipe...

Ingredients - Pastry
500g plain flour
1/2  tsp salt
175g lard
1 egg, beaten
200mls water

Ingredients - Filling
1lb (450g) minced pork
3 rashers bacon, chopped finely
Seasoning
1 egg

Ingredients - Jelly
Pork stock
Leaf gelatine

Method

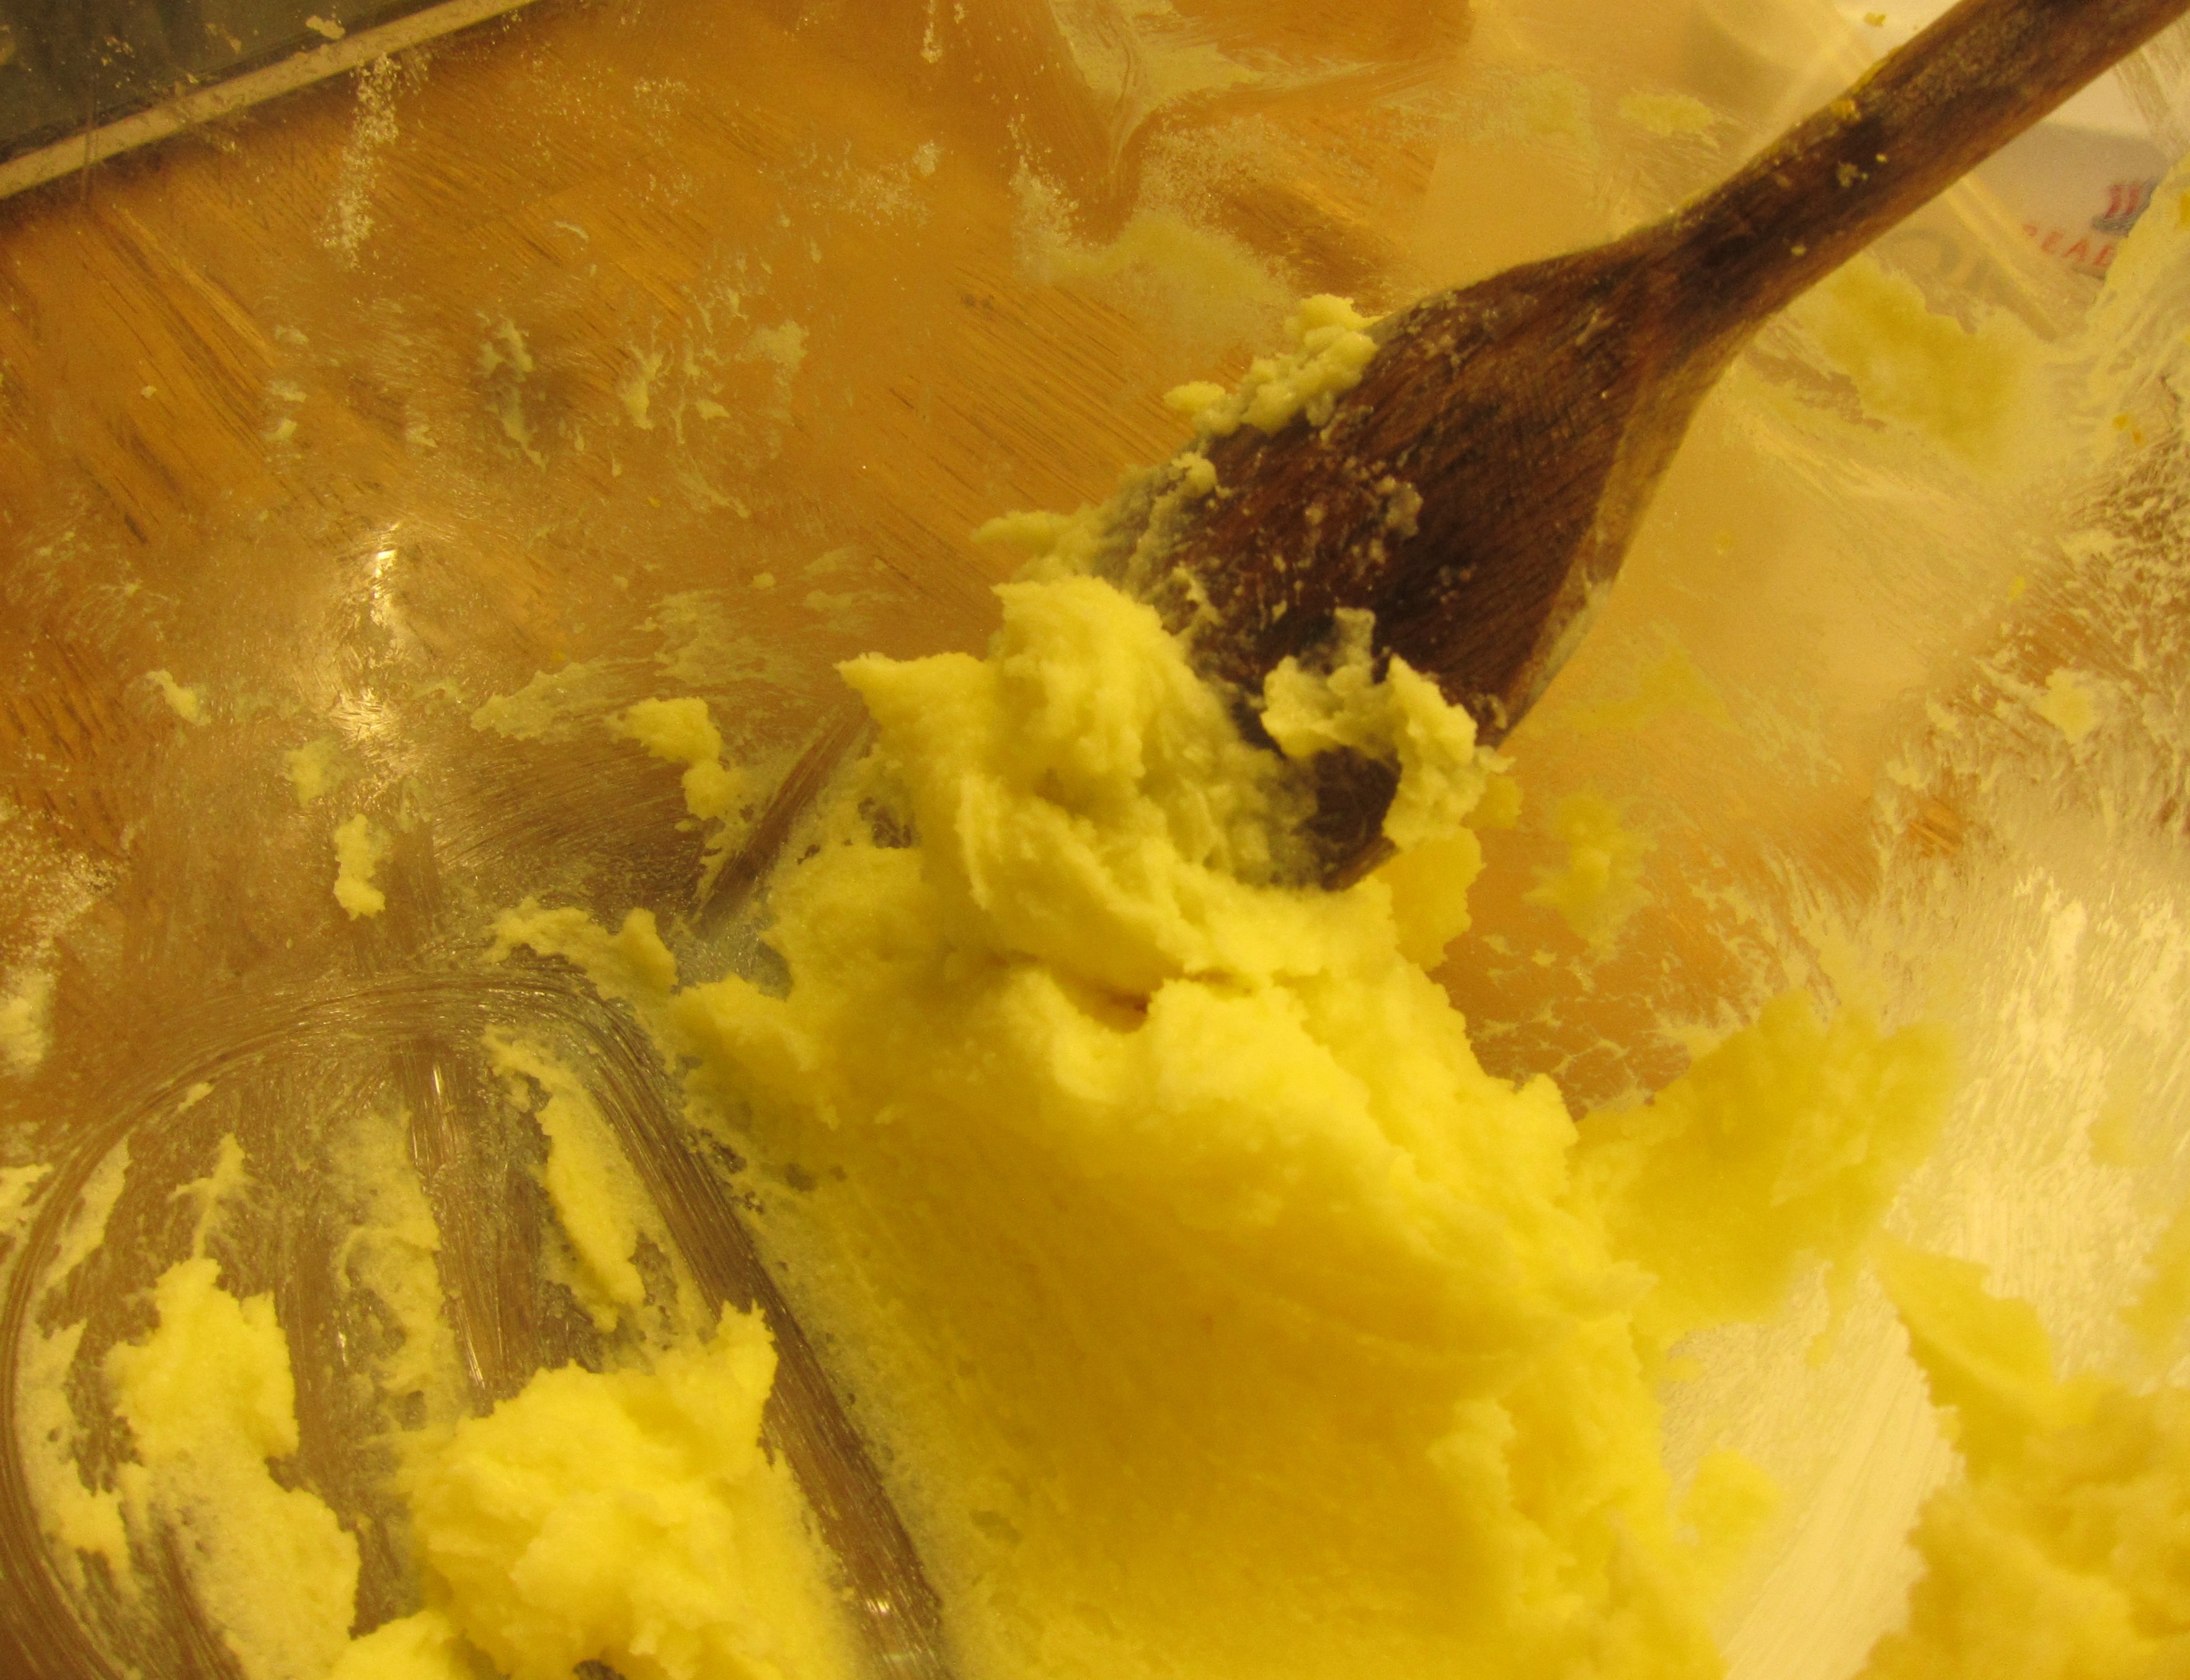
1. Begin by making the pastry.  Now, I've written about hot water crust pastry before - it's a weird thing and seems to break all the rules of pastry making.  But, easy when you know how.  So, begin by mixing the flour and salt in a large bowl.  Make a well in the centre and mix in your beaten egg.  Set aside.  Then put your lard and water in a pan, and bring to a fast, bubbling boil.  Tip into the flour, and stir well with a wooden spoon until all is combined to make a smooth dough.  Tip the hot dough onto a plate, spread out with a spoon.  Leave to cool for 15 minutes.  Then, knead well and put back onto the plate.  Chill in the fridge for 30 minutes.  Note - this pastry doesn't need to be too cold, just enough to take the heat out of it.  Too chilly and it will crack.  


2. Meanwhile, make your filling by simply combining the pork and bacon, and stirring in the egg to combine.  Season to taste.  If you like, you can fry a small portion of the meat and then taste to check your seasoning.

3. When the pastry is ready, remove from the fridge and knead gently.  Roll out into large discs (I used  a large cake cutter, 12.5cm or 5" in diameter).  You then need something to mould it round.  Traditionally, you would use a traditional wooden 'dolly'- and this can be bought at Dickinson & Morris.  However, I had to improvise so used ramekin dishes instead.  Whatever you use, flour the mould lightly and then place in the centre of the pastry disc.  Bring the pastry up around your mould, stretching gently to pull up the sides.  Then, place your mould in the fridge for about half an hour - disc side up.  This will allow your cases to firm slightly, so they don't flop when they come off the mould.  

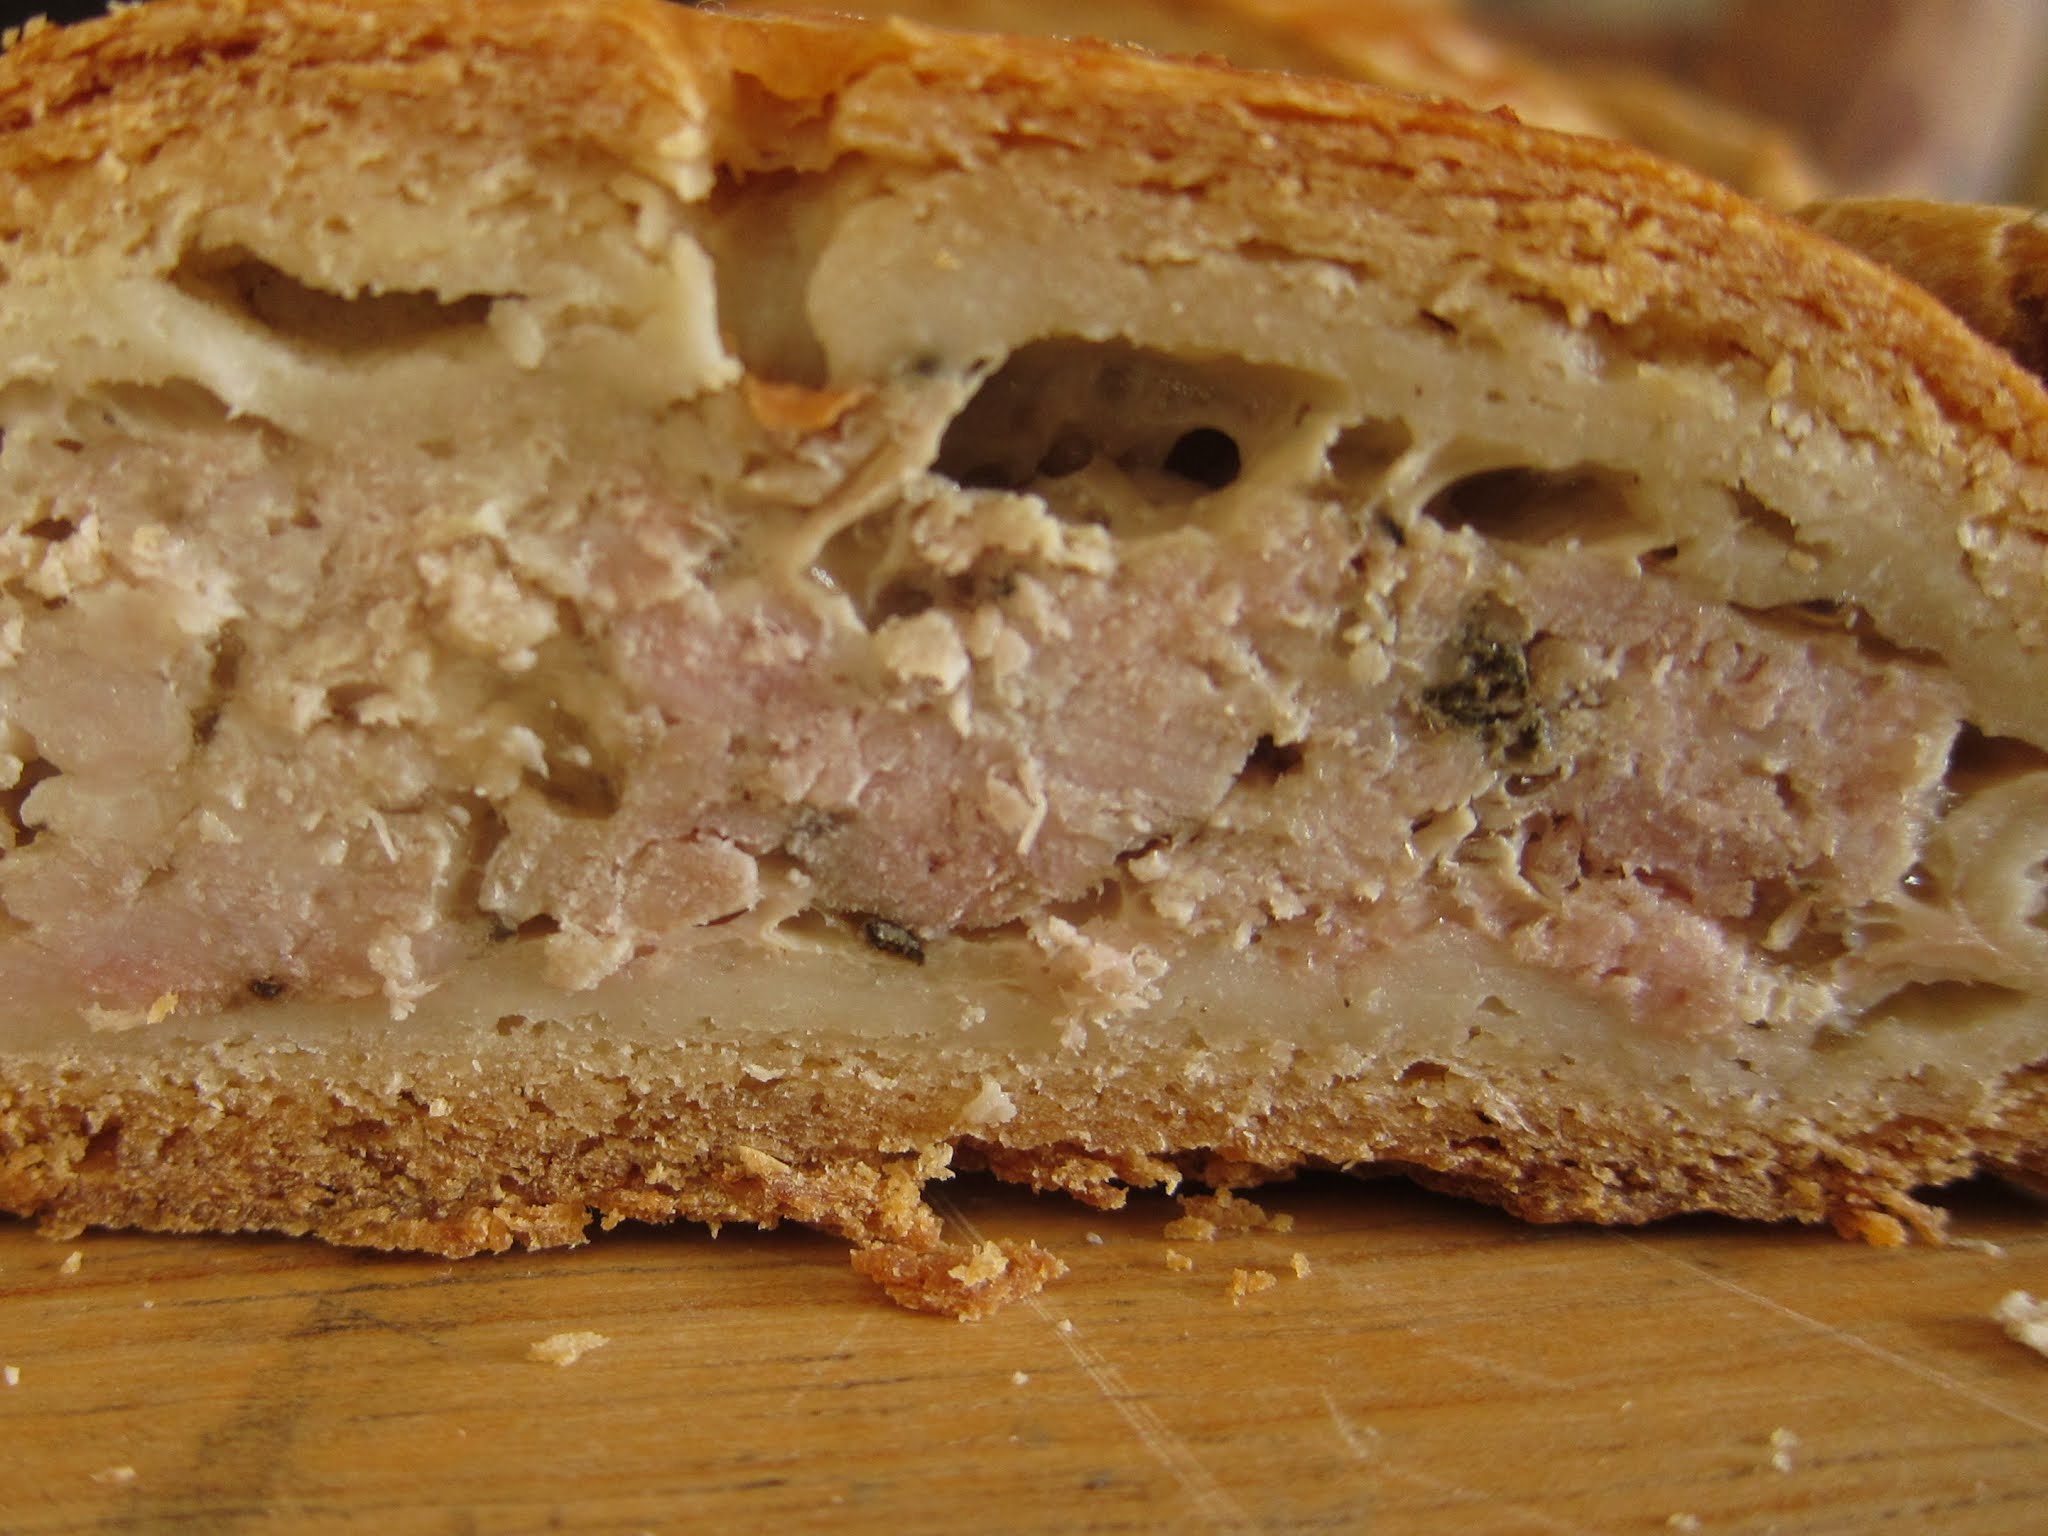
Then, gently ease the pie shell off the mould.  Stand on a baking tray, and fill with your pork mixture - pushing it well into the sides.  You want to fill about 3/4 of your shell.  Finally, place a lid on top and crimp with your fingers to seal.  Repeat until all the mixture is used (my recipe produced enough for 6 small pies and lids).

4. Put a small hole into the centre of your pie (This will enable you to add the jelly later)


5. When all the pies are complete, place back into the fridge to chill.  Dickinson & Morris recommend leaving them overnight if possible,

6. Brush the tops lightly with egg before baking


7. Now for the fun bit!  When the pies are almost cold, you need to add your jelly.  Traditional recipes use pig trotters and ham bones, and while I could have picked these up from the butcher, for blog purposes I wanted to use something that most people would have at home. It was a bit experimental, but this is what I did... Took the pork stock left over from the Sunday roast, removing the top layer of fat.  Then I took 2 gelatine leaves, soaked in cold water for 5 minutes until soft.  When they are soft, you need to squeeze out as much water as possible before putting in to a pan with the stock.  Warm gently - just to simmering point.  Don't allow to boil, or it won't set as well.  

To inject the jelly, I used a 5ml tipped medicine syringe (like this)... 
... drew up the liquid and pushed through the hole.  Each pie held 20-25 mls liquid before it started spilling back out of the top.  As you can see - Megan enjoyed helping with this job...

All you need to do now is leave your pies for several hours (preferably overnight), to ensure the jelly is set.


So, here are my finished pies. They tasted pretty authentic - although the jelly virtually disappeared. I'm not sure what happened - maybe it soaked into the pastry. It meant they were a little dry, but a lovely friend gave me some of her homemade chutney to go with them - and that made up for it.


I'll definitely have a go at hand raised pies again - might even treat myself to one of those pie dollies. I know that a couple of places local to us do pork pie making sessions, so maybe I'll join one and pick up some tips. Watch this space!


Sunday 26 July 2020

Leicestershire Hunting Recipes


Ok, so first I owe you an apology - and that is for not writing for a while. I've been unwell with a nasty, blistering hand condition, the cause of which remains a mystery. I suspect I either brushed against a plant while we were out walking, or reacted to alcohol hand gel. All better now, but it left me with peely skin (my hands looked like a new potato for a while!) - not conducive to baking. I'm really happy to be back into it now, and have a double bill of recipes for you.

Staying with Leicestershire for now, and why not - when it has plenty of recipes to share?! Researching the area, I was struck by how many recipes have their roots in hunting. This might seem obvious to true locals, but I am not one.  Now, I know that fox hunting is a very divisive issue - and I'm not here to give an opinion one way or the other.  But is has certainly shaped Leicestershire - the red fox has become the symbol of Leicester City Football Club, Leicestershire County Cricket and Leicestershire Scouting.  And hunting has given rise to some great local recipes.

Leicestershire is home to one of the world's oldest hunts, 'The Quorn'.  It was founded in 1696 by Sir Thomas Boothby, and then handed on to Hugo Meynell after Boothby's death.  Meynell is often called the 'father of fox hunting', due to his passion and dedication to the sport.  The Quorn hunt continues to this day, with all its hounds being descended fron Boothby's,  It meets on 4 days a week during the Autumn and Winter, and has up to 150 followers.  More information can be found here  https://quorn-hunt.co.uk/qhhistory.html.  The Belvoir hunt (based at Belvoir Castle), Fernie Hunt, of Market Harborough and the Cottesmore Hunt, in neighbouring Rutland, are also long established in the area.  I'm told that the Melton Carnegie Museum houses a very good exhibition about local hunt history.  Unfortunately it's closed at the moment, but here are the details if you fancy a visit in future, https://www.meltonmuseum.org/

Even after the Hunting Act (2004) banned hunting with dogs, the tradition remains strong and some say that hunt memberships have actually increased.  Hunts today are supposed to follow an artificial scent trail, rather than searching for a live animal.  However, there remains plenty of controversy and some say that foxes are still being killed.  The arguments on both sides are both interesting and persuasive.  I'll put some links here, in case you want to read more.

As I said, I'm not here to judge so let's move on to a subject which unites us all... foood!

Here are two recipes to keep a hungry hunter satisfied...

Leicestershire Hunting Pudding

This dish was created as a welcome treat for huntsmen after a long day on horseback.  When I made it, it cheered up a cool, wet July day which actually felt more like Winter!  This version comes from Paul Hollywood's excellent book, 'British Baking', and is like a lighter version of Christmas pudding.

Ingredients

100g self-raising flour
100g suet
100g light muscovado sugar
1/2 tsp freshly grated nutmeg
200g sultanas 
Grated zest and juice of 1 lemon
1 tbsp brandy (I used rum as this was all I had)
2 large eggs, lightly beaten

Method

1.  Butter 4 dariole moulds or mini pudding basins.  Line bases with baking parchment. (I didn't have any small basins, so used a 1 litre pudding bowl).
2. Place flour, suet, sugar and nutmeg into a bowl.  

Stir to combine, then mix in sultanas.  Then add lemon zest and juice, brandy (or rum) and beaten eggs.  Stir gently to create a stiff mixture.

3. Divide mixture between the moulds - or tip all into your l litre basin.  Tap bowl(s) gently on the worktop, to eliminate any air bubbles.
4 Make a lid for each pudding, by cutting a square of baking parchment and a square of tin foil - then laying them on top (I buy parchment backed foil to make it easier). 
5. Now, to tie your pudding -  I've always got into a pickle trying to do this job.  All the instructions I've read have suggested tying string round like a parcel, bringing it up to form a handle.  I could never quite manage it - the string slipped everywhere and the 'handle' was never strong enough to use.  On this occasion, I looked for a YouTube tutorial to help me, and found this very short video which changed everything.  Just tie some string around the outside and off you go!  https://www.olivemagazine.com/guides/how-to/quick-video-how-to-cover-a-pudding-for-steaming/

  
6. Stand your moulds in a large pan (I use a jam preserving pan).  Pour in enough water to come about 3/4 of the way up the side of the moulds.  Cover the pan, and heat gently for about 45 minutes (for small puddings) or 3 hours (for 1 large one).  Don't forget to put the lid on, or your tops won't cook!
7. Carefully remove the pudding(s) from the water, then run a sharp knife around the outside and turn on onto individual plates or 1 large serving plate. 


 Serve warm, with plenty of custard.

Yum, the sort of  warming Winter pud that us Brits do best!


Melton Hunt Cake

My research has shown that almost every region of Britain has its own fruit cake, from Wiltshire/Gloucestershire Lardy Cake, to Welsh Bara Brith; Irish Tea Brack; Scottish Black Bun and many more.  This recipe was created by John Dickinson in 1854, and is still available at his shop, 'Dickinson and Morris' in Melton Mowbray.  https://www.porkpie.co.uk/the-original-melton-hunt-cake.htm.    Their website describes it as 'the original fruit cake against which all others are judged' - of course!  I would describe as it similar to a Scottish Dundee Cake, with its cherry and nut topping.

Tradition was that hunt members would enjoy a piece with a glass of sherry while awaiting the start of the hunt.  You can pick one up for £10.99 at the shop, but of course you want to make your own, so here goes.  I'm grateful to the food blog 'JibberJabberUK' for this version of the recipe.

Ingredients

8oz (225g) plain flour, sifted
8oz butter
8oz (225g) dark muscovado sugar
Zest of 1 lemon
4 eggs
10 1/2 oz (300g) dried mixed fruit.  Include cranberries if you want to give your cake some 'zip'.
3 1/2 oz (100g) glace cherries, halved; washed and dried
3 1/2oz (100g) flaked almonds
3 tbsp (45ml) dark rum
For topping - 5 halved glace cherries, 8 whole blanched almonds

Method

1. Pre-heat oven to 150C/GM2
2. Soak your fruit in the rum while you begin to prepare the mixture.

2. Cream together butter, sugar and lemon zest until light and fluffy


3. Beat in the eggs very gradually (about a tbsp at a time), mixing well between additions.

4. Fold in the flour with a metal spoon, then add dried fruit and almonds. 
5. Pour mixture into the tin, and smooth the top.
6. Arrange the remaining cherries and almonds on top.
7. Bake for 45 minutes, then lower heat to 140C/GM1.
8. Bake for a further 1 hour 45 minutes, until a skewer inserted in the middle comes out clean.  If the top looks as if it may be browning too quickly, cover with a layer of baking parchment for the remaining time.
9. When cooked, remove from the oven and allow to cool in the tin.


Here's the result - it makes a moist, juicy fruit cake and could be made as a lighter alternative to Christmas cake.  We enjoyed it with a summer beach picnic.


So that's it - hope you've enjoyed this insight into a Leicestershire tradition.  Next time I'm going to tackle the most iconic hunt food of all - the pork pie.  See you soon!


Tuesday 23 June 2020

Breadmaking Extra


Hi all, moving away from history for a while to give you some pointers on bread making.  There are a few reasons for this - firstly that I know it's a popular subject at the moment.  A lot of people have told me that they're trying their hand at bread during lockdown - partly due to having more time, and also out of necessity when we've all been trying to avoid the shops.  Secondly, my beloved Kitchenaid has stopped working.  I've realised just how much I relied on it, so now trying to firm up the old arm muscles with a spot of hand baking  - and having to learn new techniques along the way!

And thirdly - I'm discovering the joys of fresh yeast!  Having always had mediocre results with my bread making, I tried baking with this at a folk festival.  The lady waxed lyrical about it, and it did make lovely bread.  However, I was unable to find it anywhere when I returned home.  During lockdown our lovely local butcher - Gamble and Hollis in Syston - have been stocking it.   It has made a huge difference!  My bread feels so soft and airy - I'm becoming quite addicted to making it.  So, do try fresh yeast if you get the chance.  Massive shout out here to all those local businesses who have kept us going through tough times - we really appreciate you!

A disclaimer - I am certainly no baking expert, and always welcome tips and hints from other people.  These are simply some tips which have helped me, as a beginner.

Here are the quantities you'll need for a basic white bread recipe:-
  • 2 tsp caster sugar
  • 425ml (3/4pt) water
  • 2 1/2 tsp dried yeast, 20g fresh yeast or 1 1/2 7g sachets fast-acting yeast
  • 750g (1lb 10oz) strong white flour]
  • 2 tsp salt
  • 40g (1 1/2oz) chilled butter or 4 tbsp olive oil

So, if you're using fresh yeast you'll need to start if off.  Place it in a jug, with 150mls of the water and your 2 tsp sugar.  Cover and leave for at least 5 minutes, until it starts to froth.  You'll see little bubbles appearing, and may even hear it fizz when you stir it.  Some recipes recommend using warm water for bread making but (this is a tip from Paul Hollywood), there is absolutely no need.  The slower the rise, the better the flavour.  So, room temperature is fine. (Note - if you're using dried yeast, there's no need to start it off.  Just add to your jug of water, and pour into the mixture - as below).

Meanwhile, sift the flour and salt into a large, roomy bowl.  Rub in butter until the mixture resembles breadcrumbs,  or mix in olive oil.  When the yeast is ready, make a well in the flour and pour it in.  Then, gradually mix in about 300 mls of water.  Again, room temperature is fine.   I use my hand like a claw, gradually pulling in all the flour - the same technique that is used to mix scones.


You may need a little more or less water (good organic flours tend to be quite 'thirsty', and often need more water than a recipe states). You want just enough that the flour is all incorporated, and your mixture feels slightly sticky. To start with, you'll have a lumpy, messy mixture.  Begin to pull it together and it will get smoother, I promise!  Knead it in the bowl until the stickiness has gone.  I find this the easiest, least messy technique.


Then, turn out onto a clean surface.  I like my silicone mat - it's a great worktop saver, and also has measurements marked on it, so it's really helpful if you want roll something to an exact size.


Knead for about 10 minutes until you have a smooth, stretchy ball.  My technique is to pull it out, roll up again,and give it a good squeeze and squash with my knuckles.  Then knock it down on the worktop, and start the cycle again.  But everyone has their own technique.  (Note - knocking on the worktop does not work when you have a dough full of dried fruit.  I learnt this to my cost - currants flying all over the kitchen!


Place into a large, oiled mixing bowl.  Cover tightly with cling film and leave to rise until it's doubled, or even tripled in size.  Again, you don't need a warm spot.  When I first tried bread making I was putting bowls by radiators, or clearing towels out of the airing cupboard to make room for my bowl.  I've also heard people say that they put it in their oven on a very low setting.  You really don't need to.. Just a draught-free spot in the kitchen is absolutely fine. 


When the dough is fully risen, knock it down in the bowl to get rid of some air.  Then, turn it out onto your clean surface again.  Knead for about 5 minutes - you're trying to get as much of that air out as possible, and getting the yeast working again.  


Now, shape your bread.  This quantity will make 2 loaves or 11-12 bread rolls.  For loaves, split in half and divide between 2 loaf tins.  For rolls, weigh out pieces of dough of about 100g each.  Roll each into a ball, tucking the base under to give a nice smooth surface.  Then, place your hand around the ball like a cage,  Roll around gently to give a nice round shape.  Place on 2 baking trays, well spaced apart.


Cover your tray or loaf tin loosely with plastic - I usually use a clean bin bag.  The idea is to give your bread room to rise, while preventing it forming a skin.  Leave for 30 minutes to 1 hour, until well risen again.  Meanwhile, preheat your oven to 200C/400F/GM6.

When your bread is ready, bake in the oven for 30-35 minutes (for loaves) or 10-12 minutes for rolls.  Here's another Paul Hollywood tip - while you're heating your oven, place a deep baking tin into the bottom.  After you put your bread in, pour about 2 litres of water into the tin and immediately shut the door.  The resulting steam will help to give your bread a really good crust.  You'll know your bread is ready if it sounds 'hollow' when tapped on the bottom.

I hope that's helped, and inspired you to try bread making if you haven't before.  Here's a French style loaf that I made the other day.  Delicious!

Would love to know if this inspires anyone to try breadmaking, and hear any tips that you might want to share!


Friday 12 June 2020

Bosworth Jumbles


So today, we continue our virtual hop around Leicestershire, going further back in time to 1485 and the last days of Richard III.  Most people will have heard the story of  'The King Under The Car Park'.   In a nutshell, Richard was King of England from 1483-1485, last monarch of the York dynasty.  Richard's army was eventually defeated by Henry Tudor at the Battle of Bosworth - west of Leicester.   Richard's body was taken to Leicester and buried without ceremony.  During the Reformation, his tomb was unearthed and, it was widely believed, his body thrown into the River Soar.  In 2012, following extensive campaigning by the Richard III society, excavations were carried out to try and find his bones.  They were eventually discovered under the Greyfriars carpark, in Leicester City Centre. Scientists at the University of Leicester were able to confirm that they were, indeed, the  remains of the King.  After a battle between the cities of York and Leicester as to who should have his bones, Leicester won.  He was finally interred there, with due pomp and ceremony, in 2015.


I can highly recommend the Official Visitor Centre, situated opposite Leicester Cathedral.  They have an extensive and interactive exhibition, covering everything from the life of Richard III to the technology that helped to uncover his bones.  His burial site, next to the centre, has been preserved and covered in glass - so you can actually see the outline of his body.  I'm told this won't last forever though - eventually the ground will collapse and fill in.  So it's worth going to see while (and when) you can.  The official website is here - https://kriii.com/

Hop across the road to Leicester Cathedral, where you can see Richard's final resting place.

You can also visit the battle site -  https://www.bosworthbattlefield.org.uk/
We visited here as a family a couple of years ago, and had a really good day out.  There's a great, child friendly exhibition, and the centre often hosts historical re-enactments.  The kids got to try on proper chain mail, and loved it!


Unfortunately it was a dull, drizzly day so we couldn't go for a walk around the battlefield site.  I've just read that it's reopened now, following lockdown - although the visitor centre isn't.  We might go on the next fine day, and take a picnic - complete with Bosworth Jumbles of course!

So, onto the biscuits.  The name 'jumble' is widely believed to come from the word 'gemmel', meaning a twin finger ring.  Jumble biscuits were originally made in the shape of 2 linked rings.  Here's one vintage 'jumble' recipe, made with what were prized spices at the time. 

The legend goes that Bosworth Jumbles were a favourite of the Yorks, and were actually taken onto the battlefield.  Furthermore, some suggest that the recipe was plucked from the hand of the King's dead cook. This news article claims that Bosworth Jumbles are nearly extinct.   https://www.hinckleytimes.net/news/local-news/bosworth-jumbles-biscuits-endangered-list-11945469
That is to say, only 3% of people had heard of them.  Definitely a reason to share it with you!


The recipe varies a lot (as you'd expect after all these years).  This is a combination of all that I found :-


Ingredients
  • 225g (8oz) self-raising flour
  • 175g (6oz) butter
  • 175g (6oz) caster sugar
  • 1 egg
  • 1 tsp grated lemon rind
  • 1/2 tsp almond essence or rosewater (optional)

1.  Preheat the oven to 180C/350F/GM 5


2.  Measure out the butter and sugar into a large mixing bowl.


3.  Mix well until light and creamy


4.  Very gradually, add in 1 egg (this bit's like making a sponge cake - don't rush or the mixture will curdle.


5.  Add in about 1 tsp freshly grated lemon zest, and almond essence or rosewater (if using).


6. Sift the flour into the creamed mixture (I like to do this over the sink, on an upturned washing up bowl.  It means that any excess flour goes in the sink, not all over the kitchen!).  Mix to a stiff consistency.


7. Take small pieces of dough (mine were about 40g each).  Roll into sausage shapes, then bend into an 's'.  I found this easiest to do on my floured pastry board.  Place the shaped dough onto a baking tray, each biscuit well spaced apart.  Bake for 10 - 15 minutes, until golden brown.


And here they are!


Now - here's where I remembered that I'm not great at biscuit baking.  They always seem to spread more than I'd hoped.  These were tasty - but quite thin and crumbly, so wouldn't be very easy to take into battle!  Here are some tips I picked up from the internet:

  1. Refrigerate the dough well - if it's too warm it will melt quickly in the oven, and therefore spread.
  2. (My dough was very soft, so I think refrigerating it would definitely have helped.  I shouldn't have been so impatient!)
  3. No need to grease the tin (which I did, as per most recipes)  The biscuits should have enough fat in them to prevent sticking - any extra will encourage melting.
  4. Cook 1 batch at a time, on the middle oven shelf.  This should help to keep them at the right temperature.  But see below.
  5. Always use a cool baking sheet - not one straight out of the oven.  If you want to reuse the sheet, wash it and cool it down.
Thanks to the following websites and blogs for advice:


This was Megan's version.  She thought the biscuits should look like snakes, so added some eyes with an icing pen.  She put one in her packed lunch for her first day back at school - a very big day indeed!


Monday 1 June 2020

Belvoir Castle Buns

So off I go, and I'm starting the journey right here in my adopted home county of Leicestershire. Seemed appropriate as I can't really travel anywhere else at the moment!  For anyone reading from abroad, it's a county in the East Midlands - so just about in the centre of England.  It's known for pork pies; Stilton and Red Leicester cheeses; and Richard III.  Oh, and for a football team who pulled off a league win that no-one ever expected.

As I'm really enjoying bread making at the moment I thought I'd try these yeast risen, sweet buns which were (apparently) a favourite of the seventh Duke of Rutland (1818-1906)

Source - Unsplash//Paula Cockcroft https://unsplash.com/photos/Iuc9g7sipCY

Belvoir Castle (pronounced 'Beaver' for those not in the know) is situated in the Vale of Belvoir, Leicestershire.   It has been home to the Duke of Rutland since 1555.  Although it's part family home,  you can tour inside and it hosts many public events.  It's been featured in various productions, including 'King Ralph', 'Da Vinci Code', 'Little Lord Fauntleroy' and most recently, Netflix series 'The Crown'.

Here's an interesting fact - in the 1840s Anna, Duchess of Bedford, spent some time at the castle.  She found that dinner was served too late for her liking, and she was becoming hungry in the afternoon.  So, she asked for a snack of tea and cake in between (well, you can demand this sort of thing when you're a duchess!)... and the tradition of 'afternoon tea' was born.

Apparently the current Duke and Duchess lead quite a colourful and unconventional life.  I'll pop this here for you to read at your leisure...

https://www.dailymail.co.uk/news/article-5184689/Duke-calls-police-lover-refuses-leave.html

Here's the Wiki page if you'd like to find out more about the Castle and family https://en.wikipedia.org/wiki/Belvoir_Castle.  And here is the official website, in case you fancy a visit https://www.belvoircastle.com/

We had a family day out at Belvoir Castle, back in the summer of 2013, having won an entrance ticket complete with guided tour.  Evan was pretty well behaved during the tour (considering he was then a boisterous 3 year old).  It wasn't until the end that he announced in a big loud voice "I don't want to go round with that lady anymore, she talks too much!"  Luckily, the guide had a good sense of humour!  Anyway, we really enjoyed exploring the grounds - there are some lovely woodland walks and we all enjoyed playing hide and seek around the battlements.  Here I hoped to bring you some lovely photos of our visit, but can I find them?  No.  Despite trawling both our hard drives, they seem to be lost.  Ah, the hazards of the digital age.


Anyway, on to the recipe...

I found several versions of this, in my books and online.  They're all pretty similar - this is from 'Taste of The East Midlands'.

Ingredients

400g/1lb plain flour
115g/4oz currants
115g/4oz sugar + 1tsp
150ml/1/4 pt lukewarm milk
50g/2oz butter
1/2oz fresh yeast or 1/4oz dried yeast
1 tsp salt
A little milk (to finish)


Method

1.  Place the flour in a mixing bowl, and stir in the salt.  Add the butter and rub it into the flour - until the mixture resembles breadcrumbs 


2. Mix in the 115g (4oz) sugar.

3.  To the lukewarm milk, add yeast and 1tsp sugar.  Stir until dissolved.  Leave to stand, covered, until it begins to froth.

4.  Pour the yeast mixture into the flour and mix well (I like to bring the ingredients together with one hand, like a claw - until they are just combined).  Then add half the currants.  Begin kneading the dough - you want it to be nice and soft, and maybe slightly sticky - but not too much to handle.  When the dough has come together, knead for at least 10 minutes - or 5 minutes in a mixer with a dough hook.  For more information on bread making, see my previous post here -

5. Here's the dough, kneaded and ready for its first rise.  Place into a large bowl, and cover tightly with cling film.


Now, the recipe says to leave the dough until it's doubled in size.  This is my dough after 4 hours of rising, rather than the usual 1-2.   As you can probably tell, it hadn't grown much.  When I pressed it with my finger, it felt firm and left a dent which didn't spring back - this is a sign that it's over-proved.  Feeling a little despondent, I read up on enriched doughs.  A few sources say that they often don't double in size, even if the recipe says they should.  This is because the extra sugar feeds on the yeast and stops it working as efficiently.  So, I think I should have checked (and prodded it) before.


6. Anyway, when the dough feels spongy - and your finger leaves a dent that slowly springs back , it is about ready.  Take it out of the bowl, knock it back and knead well again.  Megan loves this bit, she really puts some welly into it! My fabulous kitchen assistant 😀


7. Next, roll out the dough into a square about half an inch thick.  Sprinkle on the remaining currants, then roll up like a Swiss roll. 


8. Cut your dough into slices of about 2.5cm (1 inch) wide.  


9. Place the slices onto a greased baking sheet, cut side up and leave to rise again for about 30 minutes. Cover with a roomy plastic bag (I use a clean bin bag) to prevent the dough forming a skin.  Meanwhile, preheat the oven to 220C/425F/GM7.  

10. Just before baking, gently (so you don't knock any air out) brush the slices with milk.  


11. Bake the buns in a pre-heated oven for 10-12 minutes, until golden brown.

And here they are!  I was quite pleased with the way they turned out, after all.  Not sure they'd get the Duke's seal of approval - a bit more practice needed first.  They were slightly heavy, and I think this was due to the over-proving.  But they tasted good.  Stayed fresh for a couple of days, and after that I grilled them and spread them with butter - not unlike a toasted teacake.

So that's it for now.  Next time, going further back in history to the time of Richard III - with Bosworth Jumbles.  See you then!